Managing Cardholders
To create a new cardholder, do one of the following:
Double-click the root Cardholders node OR
Double-click the Cardholders node within a specific department, division or organization to create the cardholder within that location. You can still drag it to a different location later.
The dialog for adding a new cardholder (or editing an existing one) looks like this:
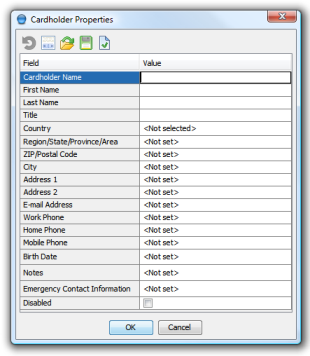
The details are all pretty self-explanatory (first name, last name, contact numbers, etc.). There are only a couple of notes to make here:
The Name is the cardholder context name in the system. It's not necessarily the person's actual name (that's what First name and Last name are for). Thus, it needs to confirm to Iotellect's context naming conventions. This sounds complicated, but it generally just means it can't have spaces in it and has to be unique within that level (you can't have two Joe contexts within the same department. One would have to be Joe1).
There's one key detail you cannot feed into this dialog: The actual card number by which the cardholder signs into the system! So after adding each cardholder, you're going to have to edit its properties and add this number.
You can also import cardholders from any other system which can output CSV files.
Editing Cardholders
When you double-click a cardholder (or right-click it and select Configure Cardholder) you get the following dialog:
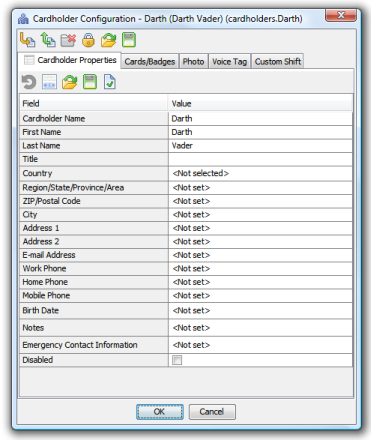
Note the extra tabs here. When adding the cardholder, you could only access the first tab (cardholder properties). Now you get four more tabs - Cards/Badges, Photo, Voice Tag and Custom Shift.
Cards/Badges: This is where you enter the cardholder's actual card information. As the name implies, each cardholder can have more than one badge associated with it. More on this under Managing Cards/Badges.
Photo: The cardholder's image, for use in various reports.
Voice tag: This is a sound file which contains a sample of the person's voice for security purposes.
Custom Shift: This lets you specify if the person works in some specific schedule (shift) different than that of the department he's in. More on this under Managing Shifts.
Moving a Cardholder or Creating One Based on an Existing Cardholder
When you drag a cardholder's node and drop it onto any other location in the organizational tree, a copy of that node is created. You can then edit it to change only a few details (such as name, badges, etc) and thus have a new cardholder based on an old one. Alternatively, you can also delete the original node and thus effectively move that cardholder onto the new location.
You can also replicate a cardholder (or any other context) or perform any of the Common Actions on it.
Selecting Multiple Cardholders
You can select multiple cardholders (using Shift+click for contiguous selection and Ctrl+click for selecting multiple cardholders in different locations in the tree). If you then right-click your selection, you will be able to edit them all together (or delete them all, etc).
Custom Cardholder Properties
Possibly, your organization may require some cardholder properties which are not present in Iotellect by default. For example, vehicle licensing plate number, or assigned parking spot, or even a complete data table containing gear assigned to this person (if the person works in the field and checks into the system remotely).
Fortunately, you can add custom properties to all cardholders. You can read all about it in the Adding Custom Properties tutorial.
Was this page helpful?