Managing Shifts
Iotellect Time and Attendance is meant to be used within two primary organization types, and has a shift arrangement suitable for each:
Office-Style Organizations - Week Shift
By "office-style" is meant your typical 9-to-5 organization, where the bulk of your workforce arrives together and leaves together. You can still have exceptions (night guards, night-shift sysadmins, etc.) but these would their own shift.
Such an organization would employ at least one week shift. This shift type lets you view an entire working week and set up a week-based schedule (Monday, Tuesday, etc).
We'll use a typical example to set up a Week Shift. We will include sub-headings for people who like to skim the manual -- you can read it straight through or skip to the part you like.
Shift Properties
- Double-click the Shifts node to open the Shift Properties dialog for adding a new shift.
- Enter the following details:
Name: Name of the shift. Regular context naming conventions apply -- no spaces allowed. Enter "NormalWeek"
Description: The description which would appear in the System Tree, etc. Enter "Normal Work Week".
Type: This is where you select either a Week Shift or a Regular Shift. For this example, select Week Shift.
 | Shift type cannot be changed after shift creation. |
Overtime After End: Can employees stay longer and accrue overtime?
Overtime Before Begin: Can employees punch in earlier and accrue overtime?
Overtime Day Off: Can employees still show up during an official "day off" and accrue overtime for it?
Overtime During Lunch: Can employees take a shorter lunch, or skip it altogether, and accrue overtime for it?
- Configure these as per your organizational policy, and click OK.
Schedule
- Now double-click the shift you created (Normal Work Week) to configure the schedule for it.
- Click the Schedule tab:

- As you can see, each day gets a row with the following fields:
Is Workday: Should the employee arrive at the office on this day?
Report Time: When should they be punching in?
Knock Off Time: When is the time to leave?
Lunch: Type of lunch, one of the following:
- None - no dedicated lunch time is assumed, any work interruptions during the day will be processed as breaks.
- Fixed - in this case fixed Lunch Begin Hour and Lunch End Hour should be set. The system employs a special algorithm to find a single work interruption which time and duration closely matches to lunch time/duration. This work interruption is treated as lunch time, and all other work interruptions during the day are processes as breaks.
- Flexible - in this case Lunch Duration should be set. The first minutes of work interruptions are registered as lunch time, all work interruption time that exceeds Lunch Duration is considered as break time.
 | See Calculating Breaks for lunch/break time processing details. |
Lunch Begin Hour, Lunch Finish Hour: Margins of lunch time, used when Lunch field is set to Fixed.
Lunch Duration: The maximum length of lunch time, used when Lunch field is set to Flexible.
Maximum Overtime Extent (minutes): How much overtime can an employee accrue on a single one of these days?
Minimum Overtime Extent (minutes): How long should an employee stay after the knock-off time for it to be considered overtime? For example, if this is 15 minutes and the employee leaves at 18:10, these ten minutes will not be counted at all! They are not overtime, but they are after the knock-off time too, so they will simply be discarded and the employee will not get any compensation for them at all. This is a crucial point to understand, because misconfiguring this setting may lead to a violation of applicable labor laws.
 | Both of the overtime extent durations also apply to overtime before the workday begins, in case this is allowed (see Overtime Before Begin above). |
Exceptions
The Exceptions tab lets you configure holidays:

Start Date: When does the holiday begin?
End Date: When does it end?
All other fields are as above.
 | If Is Workday is not checked for the holiday and Overtime Day Off is not checked under Shift Properties tab, employees arriving during the holiday would get no pay at all -- as if the office is closed and they are there on their own time. Make sure to check Overtime Day Off if employees on this shift are needed during the days set as exceptions. |
Factory-Style Organizations - Regular Shift
Regular shifts are build as cycles of days, not as a specific workweek. For example, you can have a 3-day cycle: Two days are working days, and the third day is off. Let's configure a regular shift:
Shift Properties
- Double-click the Shifts node and follow the same instructions given for shift properties above. One difference, of course: Under Type be sure to select Regular Shift.
Schedule
- Now double-click the shift you created to configure the schedule for it.
- Click the Schedule tab:

This is where the difference between the Week and the Regular shift becomes very clear. Whereas the Week shift gave us a pre-filled table with seven days, here we get a blank table.
All properties are exactly the same as above (see Managing Shifts above), but the shift is a cycle of days. You can have a three-day cycle, a two-week cycle, etc.
Exceptions
Exceptions are configured just like for a Weekly shift above.
Start Date
When you create a Regular Shift, Iotellect configures another parameter for it which is different than a weekly shift: The Start Date. This is needed for Iotellect to later tell what day of the regular shift an employee worked on due to the cyclic nature of the regular shift. For example, if you have a regular shift which defines a three-day cycle, and an employee worked five days, day number five would correspond to day 2 of the regular shift. To figure this out, Iotellect needs to know the start date for the regular shift.
You can see this setting and change it (not recommended) by re-accessing the regular shift properties once it has been created (not during the initial creation process itself).
Assigning Shifts
for Organizations
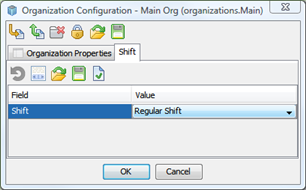
Double-click an organization within the tree, click the Shift tab and select the shift you wish to apply to that organization and all contexts it contains.

Custom Shifts for Divisions, Departments and Cardholders
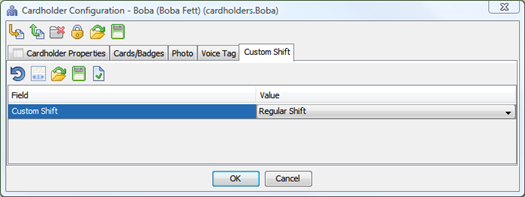
Even if you assign a shift to an entire organizations, you can still assign different shifts to divisions, departments or cardholders within that organization.
Double-click a division, a department, or a cardholder. Click the Custom Shift tab and set the Custom Shift field to the shift you wish to assign for that context.

Default Shift
There is an auto-created week shift called Default Shift. It can be edited, but its removal is not allowed. It defines a "classic" Monday-to-Friday 8-hours working week.
Was this page helpful?