Flexible Driver Tutorial (Incoming Data)
This article will explore the capabilities of the Flexible Driver and how it can be used to handle arbitrary incoming data from a TCP connection.
Iotellect includes drivers for many different devices, which simplifies integrating them into the system. In cases where there is no driver in Iotellect for a given device (for example a device using a proprietary protocol), there are several options for integrating the device. The first option is to write a plugin for Iotellect in Java, and although this is straightforward, it is labor intensive. Another option is to configure one or more instances of the Flexible Driver in order to process incoming data as variable or event data.
Introduction to Driver Operation
Throughout the following tutorial, there are numerous expressions using the environment variable command. This variable is referenced by {env/command} in the various expressions. In an Iotellect using the Flexible Driver, configured to receive incoming data, this variable contains the data which was received and is being processed by driver.
Configuring the Flexible Plugin
The first step is to configure the Flexible Driver plugin to correctly route incoming data to a specific Flexible Driver device. In the root context, open the Drivers/Plugins context and choose Edit Driver/Plugin Properties of the Flexible driver.
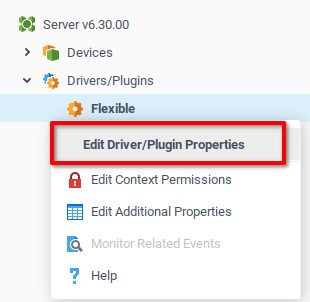
From the Properties window, add a new row for every device which will be processing incoming data. Initially, add a single row with the below indicated data.
Property Name | Value | Notes |
|---|---|---|
Description |
| User friendly name for the device configuration. |
Protocol |
| The data type which the Flexible driver device will be processing. |
Port |
| Indicate the port where Iotellect should listen to incoming TCP connections. 3010 is a typical port for TCP connections, but you can choose any available port. |
Secure |
| Indicate whether the connection is encrypted with SSL/TLS. |
Input Stream Splitter Expression |
| Defines the number of bytes to be taken from the input data stream. The raw command is available in the environment variable |
Input Stream Splitter Mode |
| Indicates when to trigger the Input Stream Splitter Expression; In this case, it will be triggered once, at the end of the message. If the option Attempt to split on every byte is chosen, the Input Stream Splitter Expression will be triggered once for every byte in the block, where |
Encode Expression |
| Used when the driver is sending data. One usage example would be to calculate a checksum and append it before sending. In this example, we simply send the exact command. |
Decode Expression |
| Used when receiving a data packet. This expression pre-processes the data packet before the further processing. This might be used to simply trim terminal characters from the packet or completely transform the data, e.g. by decrypting/decompressing it. |
Device ID Detection Method Expression |
| Expression that defines the method for calculating the ID, and which returns:
This example uses value 1, since we will be sending arbitrary data. |
Read Device ID Expression | Not used in this example. If the Device ID Detection Method Expression is The response to the device ID request command is then sent to Device ID Processing Expression in order to determine the device ID. | |
Device ID Processing Expression |
| The result of this command determines the device ID. We set it to be If we were expecting different devices to be communicating on the same port, we could set this dynamically based on the incoming message, or the response to the Read Device ID Expression. As with previous |
Encoding |
| There are several different encodings available, for this example we use ASCII. |
The following screenshot shows a row of the Flexible Driver Global Settings configured according to the preceding table.

You have set the global configurations of the flexible driver to accept TCP packets on port 5040, interpret each payload as ASCII-encoded, and forward the payload to the flexible driver device with ID "1". The next section is to configure a device with ID "1" that will further process incoming TCP payloads.
Creating a Device
To create a Flexible device, click Add Device from the Devices context in the root context. Configure the device with the following parameters:
Property Name | Value | Notes |
|---|---|---|
Device Driver |
| This tutorial is for the Flexible driver |
Device Name |
| This will be part of the context path for referencing the device in Iotellect. |
Device Description |
| User friendly name for the device. |
Connection |
| Indicate that this device will be processing incoming connections. |
Device ID |
| This takes a string value, and must match the value indicated in Device ID Processing Expression during the previous step. |
The following screenshot shows the above configurations entered into the “Add Device” window. Click OK to save and open the Device Properties page.
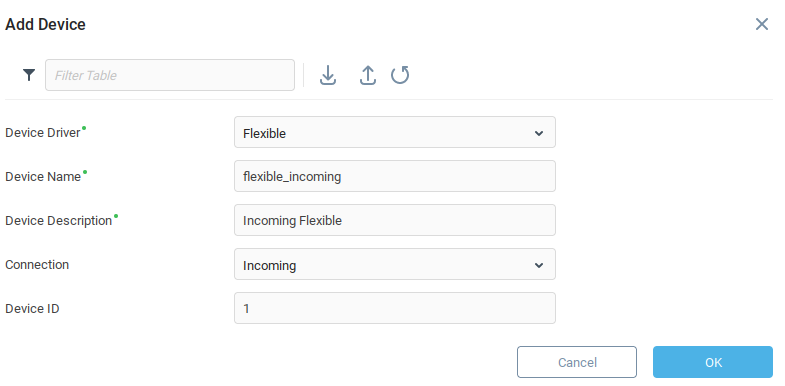
Once the device has been created, the Device Properties window should open automatically. The window can also be opened by clicking Edit Device Properties from the context menu of the newly created device.
Adding a Variable to the Device
In order to associate incoming data with the device, create at least one variable. Navigate to the Static Variables tab and add a row with the following data:
Field Name | Value | Notes |
|---|---|---|
Name |
| This will be part of the context path for referencing the variable in Iotellect expression language. |
Description |
| User friendly name for the variable |
Format |
| Describing the fields of the variable’s data table. We describe a table with a single field named |
Readable |
| Allows the variable to be read |
Writable |
| Allows the variable to be written |
Configuring a row in the Static Variables tab results in the following:

The device now has a variable data, where incoming data can be written.
Configuring an Event for the Device
Another way of interacting with the device is to trigger specific events. Open the Static Events tab of the Device Properties, and add a row with the indicated data, leaving unmentioned fields blank:
Field Name | Value | Notes |
|---|---|---|
Name |
| This will be part of the context path for referencing the event in the Iotellect expression language. |
Description |
| User-friendly name for the event. |
Format |
| Describing the fields of the data table for the event. We describe a table with a single field named |
Level |
| Set the Event Level of the event as information. |
Configuring a static event with the above values results in the following:

This will allow the device to trigger events when certain data packets are received.
Configuring Operations Properties
The properties of the Operations tab determine how the device will respond to incoming data in the case of an incoming connection as well as how outgoing connections are processed. The following configurations are for devices which accept incoming connections.
Data Operations
Property Name | Value | Notes |
Asynchronous Command Detector Expression |
| This expression can access
|
Event/Variable Update Qualifier Expression | contains({env/command},"variable") ? 1 | Evaluated only if Asynchronous Command Detector Expression evaluates to
In this case, if the incoming command string contains the sub-string |
Command ID Expression |
| The Command ID Expression field and the Reply ID Expression field are accepted into operation only if Asynchronous Command Detector Expression returns |
Reply ID Expression |
|
Asynchronous Variable Processing
Property Name | Value | Notes |
Variable Name Expression |
| Indicates the name of the variable which will be updated if the Event/Variable Update Qualifier Expression returns |
Variable Timestamp Expression |
| Timestamp to apply to the variable update. |
Variable Quality Expression |
| Data quality to apply to the variable update |
Variable Value Expression |
| Data table with which to update the variable. Must match the format defined for the variable. |
Asynchronous Event Processing
Property Name | Value | Notes |
Event Name Expression |
| Indicates the name of the event which will be created if the Event/Variable Update Qualifier Expression returns |
Event Timestamp Expression |
| Timestamp to apply to the event update. |
Event Level Expression |
| The level at which the event will be created |
Event Value Expression |
| Data table for the event. Must match the format defined for the event data table. |
The remaining sections can be left blank. Configuring the properties of the Operations tab should result in something similar to the below screenshot
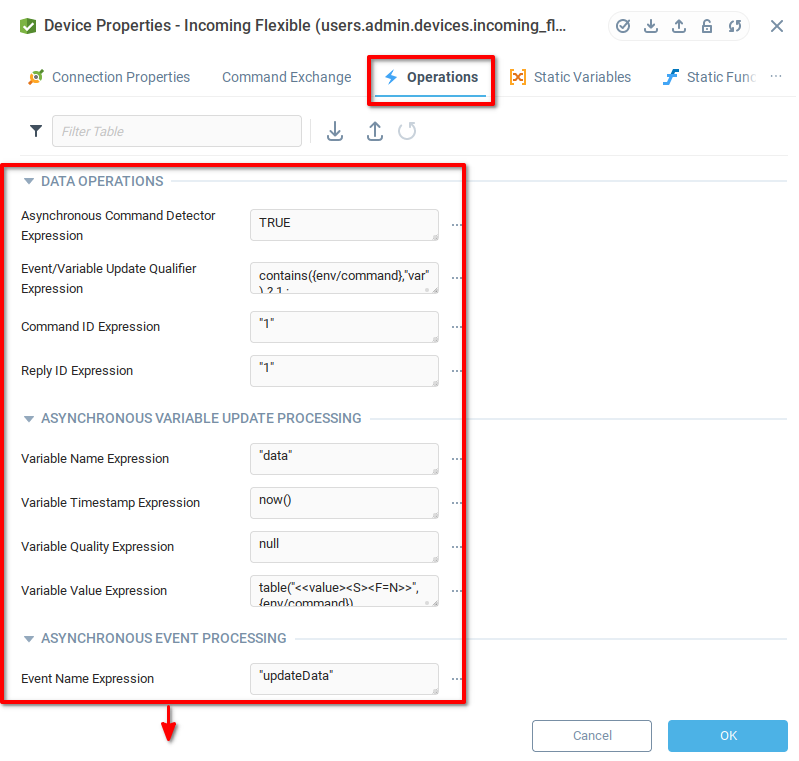
Now that the Iotellect device is configured to process incoming messages with the flexible driver, it can be tested by sending some messages.
Sending Data to the Iotellect Device
There are a few ways to send arbitrary TCP data. One option is to use a specialized tool, such as Packet Sender, another is to write a simple program which creates a TCP connection and sends the desired data.
Using Packet Sender to Send a Packet
Download and install packet sender on the same operating system where Iotellect server is running
Create a packet with the following configurations:
Property | Value | Description |
|---|---|---|
Name |
| If you want to save the packet for repeated usage |
ASCII |
| ASCII text to send. |
HEX |
| Automatically encoded HEX value of the indicated ASCII text. |
Address |
| Host or IP address to send the packet to |
Port |
| Port to send the packet to |
Resend Delay |
| Delay before resending the packet |
Communication Type |
| The connection type to establish with the server. |
The configured Packet Sender window will appear as follows.

Click Send to send the packet to the Iotellect flexible driver device.
Using Python to Send a Packet
Install Python 3 on the same machine running Iotellect server.
Save the below example script in a file called sendpacket.py:
import socket
# Set up the socket connection
s = socket.socket(socket.AF_INET, socket.SOCK_STREAM)
# Hostname or IP address where server is running
host = 'localhost'
# Port where Flexible Driver is configured to listen to incoming data
port = 5040
# Start connection
s.connect((host, port))
# Send data
data = b'var: Update data with some arbitrary TCP data.'
s.sendall(data)
# Close the connection
s.close()Run the script from the command line with the command
python3 sendpacket.py
Confirm the Packet was Received by the Flexible Driver Device
Open the context menu of the device from the root context, and click Manage Device
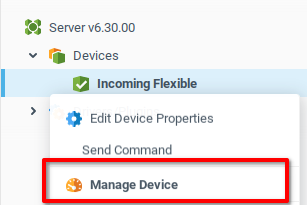
This opens a window with all the device variables, in this case the variable data, with the data we sent as a packet
var: Update "data" variable with some arbitrary TCP data.

The variable can be accessed in the expression language with the context path
{users.admin.devices.incoming_flexible:data}
Triggering an Event in the Flexible Device
We can trigger the updateData event we configured above, rather than updating a variable, by simply changing the data being sent to the device.
Recall that the Event/Variable Update Qualifier Expression determines whether incoming data will be processed as an event or a variable update operation. We used the following expression:
contains({env/command},"variable") ? 1 : (contains({env/command},"event") ? 0 : 1)This expression first checks to see if the command contains the string “variable”. If so, it evaluates to 1 and the command is processed as a variable update. If the command does not contain the string “variable”, it checks if the command contains the string “event”. If the command does contain the string “event”, the expression evaluates to 0, and the command is processed as an event. If neither “variable” or “event” are present, it defaults to 1 and updates the variable.
To trigger an event, simply change the content of the test packet to contain the string “event” and remove the string “variable”. For example: event: This is an event!.
Using Packet Sender, update the ASCII and HEX data as indicated below:
Property | Value | Description |
|---|---|---|
Name |
| If you want to save the packet for repeated usage |
ASCII |
| ASCII text to send. |
HEX |
| Automatically encoded HEX value of the indicated ASCII text. |
Address |
| Host or IP address to send the packet to |
Port |
| Port to send the packet to |
Resend Delay |
| Delay before resending the packet |
Communication Type |
| The connection type to establish with the server. |
If using the Python script, update the data variable as indicated below:
...
# Send data
data = b'event: This is an event!'
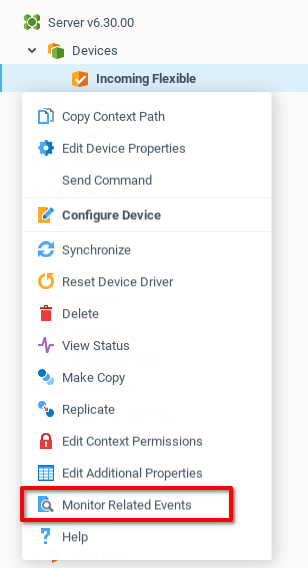
...In the Iotellect Context Tree, open the context menu of the Incoming Flexible device, and select Monitor Related Events.
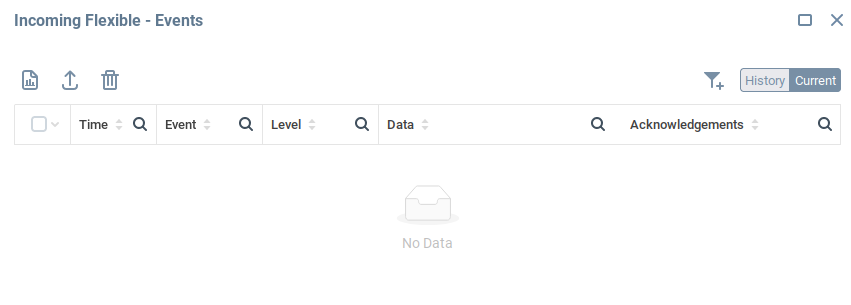
A window appears, indicating all current events of the Incoming Flexible device. In our case, there are no active events, so the data table is empty.
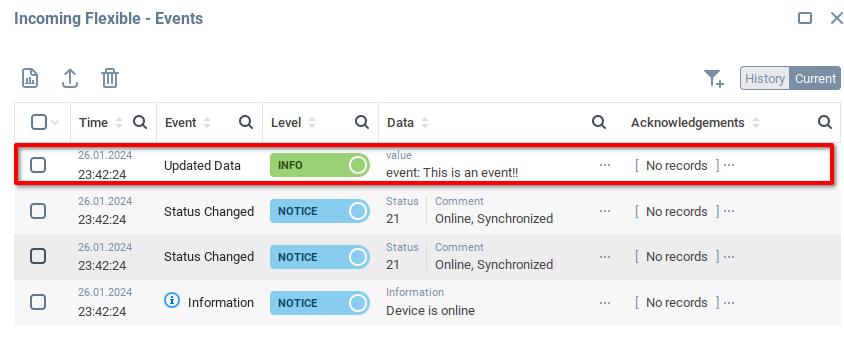
Send the packet from Packet Sender, or run the Python script, and see that the event is fired:
Once you have created more events for the device, the Event Name Expression and Event Data Expression can be configured with more complex functions in order to trigger different events, based on the content of the command.
Was this page helpful?